June 10th, 2026
This would probably be my first posting on here that would not be reposted on my FB.
When one has a budget contraint that would limit your splurge on more powerful computing hardware, you will have make do with some DIY talent; and with some software integration knowhow, to put it all together for a use case.
For me, it was a need to setup a safe home network environment that connects up my desktop, laptop, NAS devices and various home/mobile devices, plus all my family’s mobile and home devices onto both cabled and wireless networks and connected up to the Internet.
Now if you don’t know about this yet – then you better get wise-up now – there are ALOT of malicious or semi-malicious malware threats constantly being bombarded at any devices from the Internet, be it the mobile phone, home IoT stuff or whatever, and at times even the devices themselves are broadcasting or scanning your home networks as we speak!
The cybersecurity term for these activities are Network Discovery, Rogue Scanning, or Lateral Movement Initialization.While these protocols (like mDNS and UPnP) are designed for harmless convenience eg. like letting your phone find a smart TV, malware uses these exact same “small programs” to map out your home network and find vulnerable targets.
So, understand these Threats now:
- Network Discovery: Automated scanning to find active devices.
- Asset Reconnaissance: Identifying device types, operating systems, and open ports.
- Lateral Movement: Spreading from one compromised device to another.
- Shadow IoT: Unauthorized, hidden devices communicating on your network.
So, what then would constitute to be the BEST bare minimum you must do for every home network setup?
The Bare Minimum Security Layer
A home network MUST first have these fundamental, effortless baseline protections:
- Strong Router Passwords: Changing the default admin login credentials.
- WPA3 or WPA2 Encryption: Securing the Wi-Fi broadcast with a strong passphrase.
- Automatic Firmware Updates: Enabling auto-updates on the router and core devices.
- Built-in Firewalls: Keeping the router’s default SPI (Stateful Packet Inspection) firewall turned on.
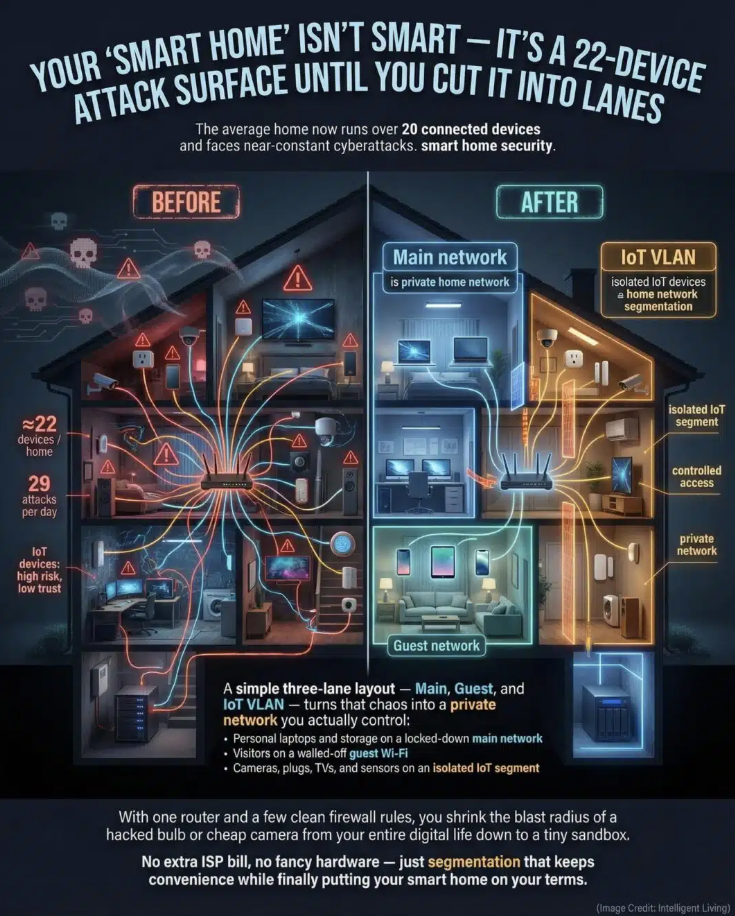
Segregate Your Network
- Create a dedicated Guest Wi-Fi network. Move all smart TVs and IoT devices there. Keep main computers and phones on the primary network. This stops compromised smart devices from seeing your computers.
2. Disable Universal Plug and Play (UPnP). Log into your home router’s admin panel, locate the network settings or advanced tab and toggle UPnP to “Disabled”. This blocks automated, unauthenticated port mappings.
3. Change Default Credentials. Update every new device’s factory password immediately. Use unique passwords for each smart device. This prevents automated scripts from guessing passwords.
4. Turn On Client Isolation. Enable AP Isolation (Access Point Isolation) on your router. This stops wireless devices from communicating with each other. Devices can access the internet but cannot scan neighbors.
Device-Level Protection Steps
- Audit Device Permissions: Review app settings on your mobile phones.
- Revoke Network Access: Deny “Local Network” permissions for apps that do not need it.
- Update Firmware Automatically: Enable auto-updates on TVs and smart appliances.
- Turn Off Unused Tech: Disable Bluetooth and Wi-Fi on devices when not in use.
Once all that is done, now comes the ‘Tier 2’ line of Defence…
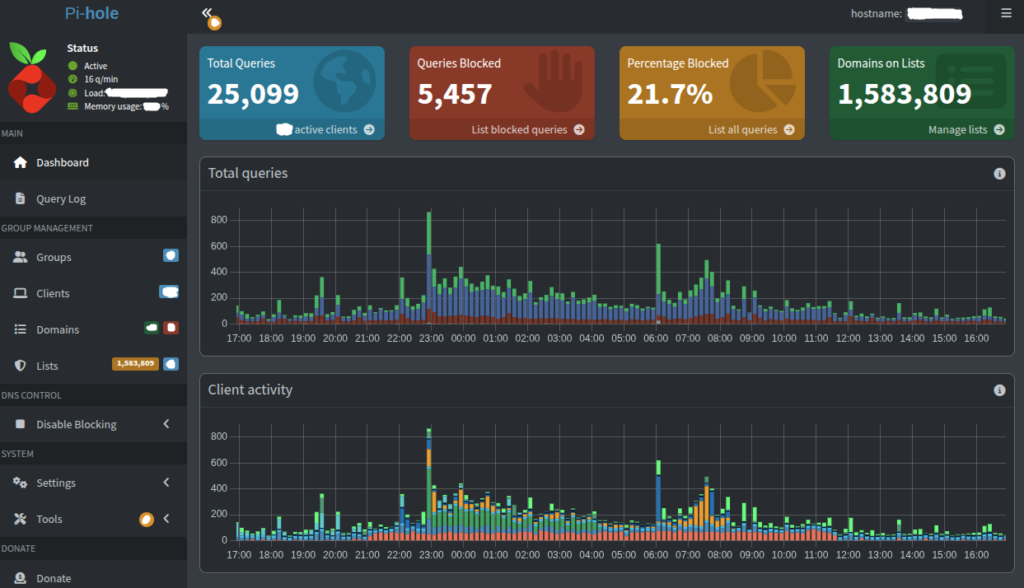
Pi-hole / AdGuard as a “Tier 2” Defence
Once the basics are checked, adding a DNS resolver is the PERFECT next step. It acts as a powerful security upgrade for specific reasons:
Blocks “Phone Home” Traffic: It stops compromised smart devices from contacting known malicious command-and-control (C2) servers.
Halts Telemetry: It blocks smart TVs and appliances from uploading your private data to tracking servers.
Stops Phishing and Ads: It prevents devices from loading malicious links at the network level.
Identifies Rogue Devices: The query log reveals exactly which device is making suspicious or excessive network requests.
Which is why I DIY-ed a NAS system with its rows of HDDs for storage, and a fast motherboard with ample SATA ports to manage them, plus a number of 2.5Gb + 10Gb LAN ports for fast data traffic. Then installed TrueNAS Scale v25 as the leading OS platform and run apps for PiHole DNS, WordPress for website hosting and Nginx Proxy Manager to manage the reverse proxies for the website.
Having said that, yeah it sounds simple to do, well it is NOT. You need to be endowed with a solid foundation of networking and DNS configuration basics, TrueNAS, PiHole, WordPress and Nginx Proxy Manager! Even a competent techie like me had to resort to turning to AI to help resolve some of the teething, frustrating, configuration tweaks to get it all working. (Most of the freebie YouTube videos cannot help as they are either using slightly variant hardware compared to yours or; they skip out on tiny critical details). I will probably be sharing all the juicy tips learnt from all that messing about in another blog post soon enough, so look out for it.
An important point to note: a DNS blackhole still cannot stop lateral movements. DNS sinks only block traffic heading out to the internet. If a smart TV scans your local network to attack your phone, that traffic bypasses the DNS server entirely. So, as previously emphasized above, you STILL need to ‘Segregate Your Network’!
Use Network Segmentation (aka. Guest Wi-Fi) or AP Isolation to stop local device-to-device spying activities.
And that’s it for the most Basic HomeLab Security Setup!
Leave a Reply